Brake pad measurement is one of the most critical safety checks you can perform on your vehicle. Worn brake pads compromise your stopping power, increase accident risk, and can damage expensive brake components like rotors and calipers.
This guide shows you exactly how to measure your brake pads, understand safe thickness levels, and recognize when replacement is necessary.
Brake Pad Thickness
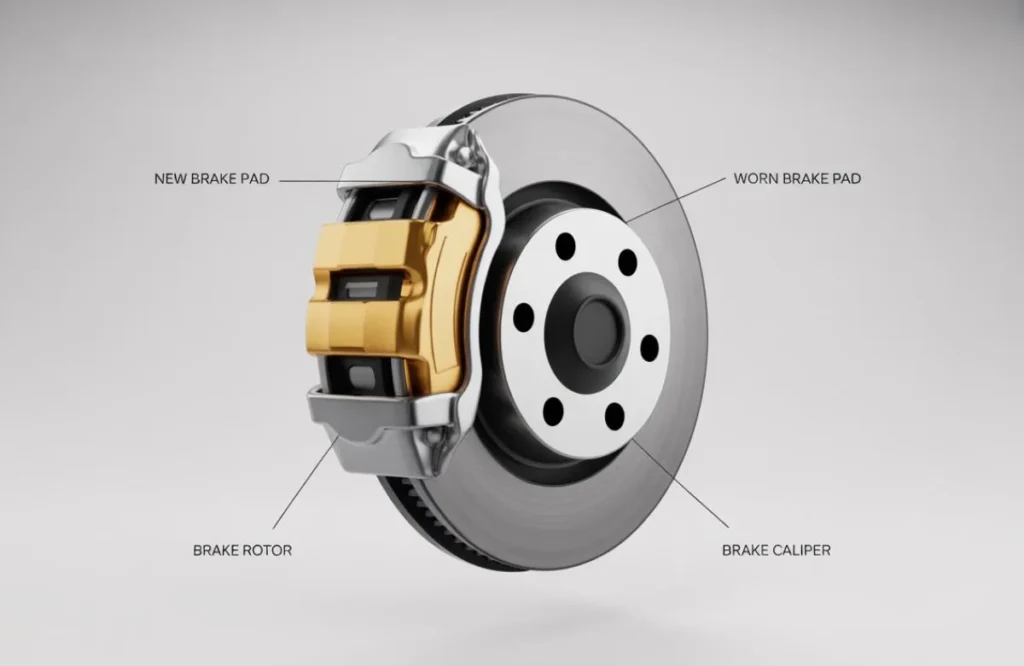
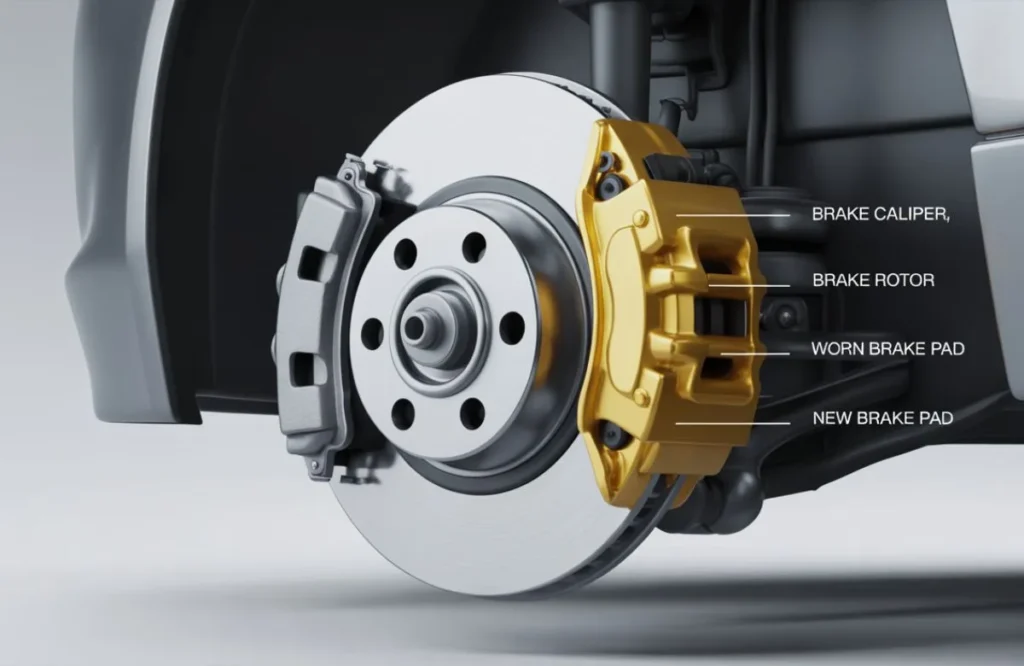
Brake pads are friction components that press against your vehicle’s brake rotors to create the stopping force. Each pad consists of a steel backing plate bonded to friction material—the part that actually wears down over time.
New brake pads typically measure 10-12mm thick for standard passenger vehicles. Performance and heavy-duty vehicles often feature thicker pads ranging from 12-15mm to handle increased braking demands.
Friction material deteriorates gradually through normal use. Every time you press the brake pedal, microscopic particles transfer from the pad to the rotor surface. This process, called “bedding,” creates optimal friction but slowly reduces pad thickness.
How to Measure Brake Pad Thickness
Visual inspection through your wheel spokes offers a quick preliminary assessment. Park on level ground, turn your steering wheel fully to one side, and shine a flashlight through the wheel opening. Look for the brake pad sandwiched between the caliper and rotor—it should appear thicker than the steel backing plate.
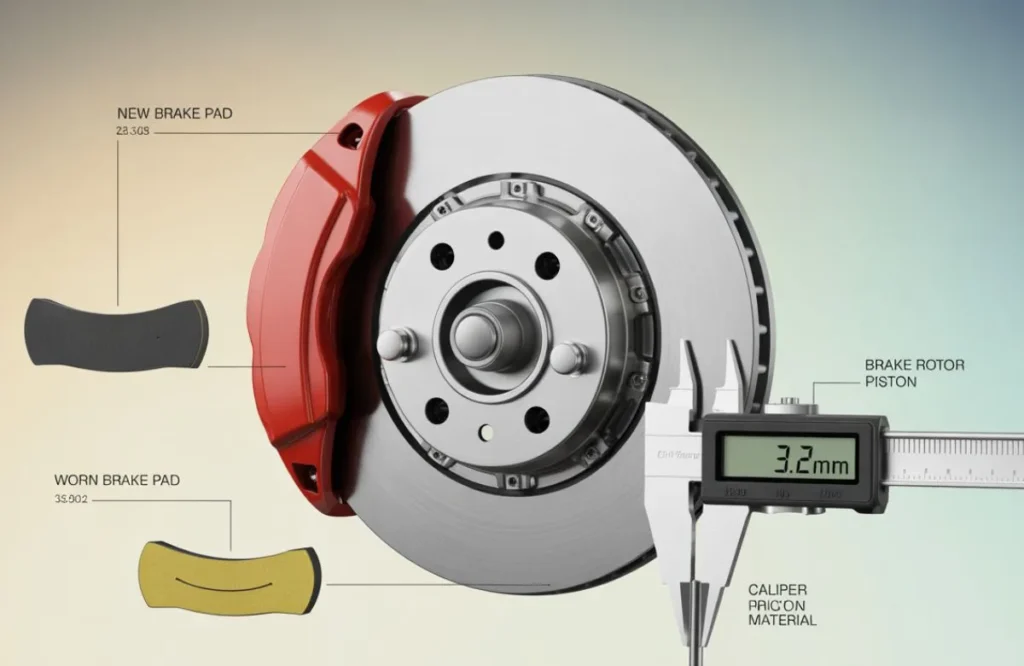
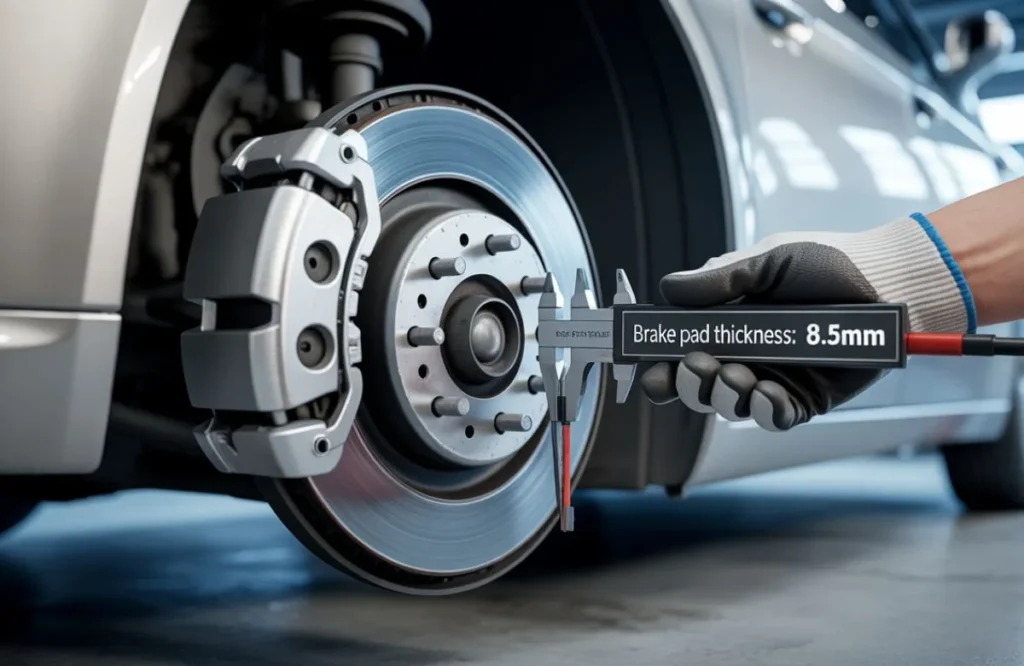
For precise brake pad measurement, you’ll need to remove the wheel. Use a digital caliper or brake pad gauge to measure from the backing plate to the friction material’s outer edge. Take readings at multiple points across the pad surface to detect uneven wear patterns that indicate caliper problems.
Professional mechanics recommend measuring both inner and outer pads on each wheel. Inner pads often wear faster due to caliper piston pressure distribution. Position your measuring tool perpendicular to the pad surface and record thickness at the thinnest point—this determines your actual remaining life.
Digital inspection cameras threaded through wheel openings enable assessment without wheel removal. These tools prove valuable during routine service appointments, though they cannot replace comprehensive visual inspection when addressing specific brake concerns or unusual noises.
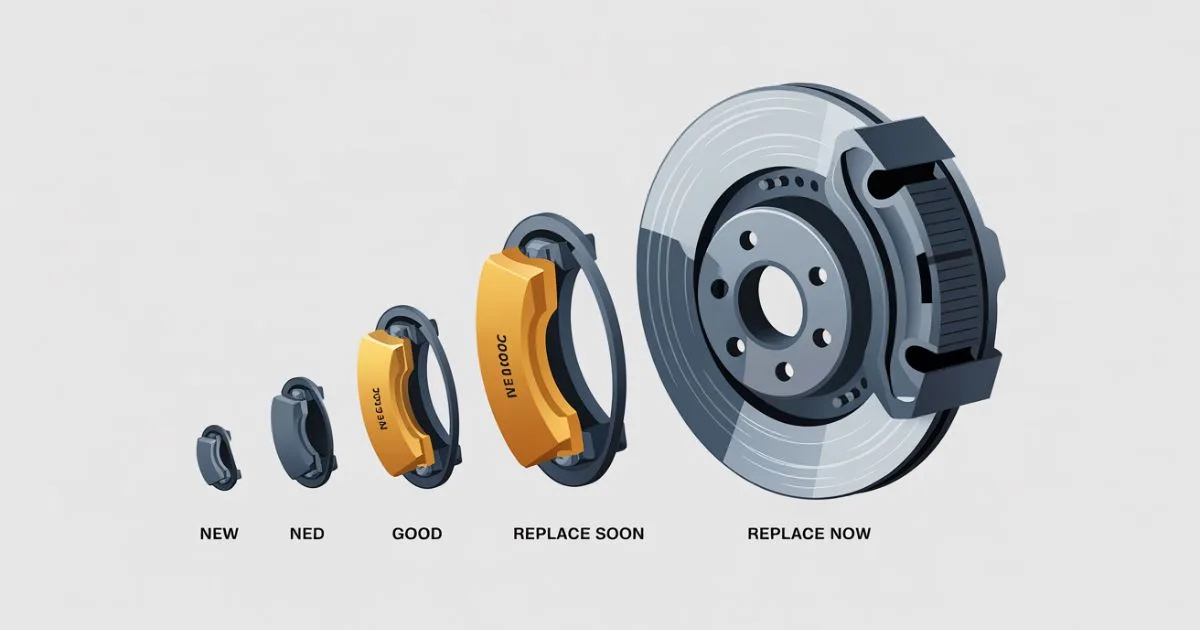
Brake Pad Thickness Chart
Know exactly when to replace your brakes – simple, clear, and safe
| Thickness (mm) | Thickness (inches) | Wear Level | Recommended Action | Remaining Life |
|---|---|---|---|---|
| 10–12 mm | ⅜” – ½” | New / Excellent | Drive normally | 100–75% |
| 8–10 mm | ⁵⁄₁₆” – ⅜” | Good | Monitor regularly | 75–50% |
| 6–8 mm | ¼” – ⁵⁄₁₆” | Fair | Plan replacement | 50–35% |
| 4–6 mm | ⁵⁄₃₂” – ¼” | Worn | Replace soon | 35–20% |
| 3–4 mm | ⅛” – ⁵⁄₃₂” | Critical | Replace immediately | 20–10% |
| Below 3 mm | Below ⅛” | Dangerous | Do NOT drive | 0% |
Warning Signs Your Brake Pads Need Replacement
Squealing noises during braking indicate your pads have reached their wear indicator—a small metal tab designed to contact the rotor and create an audible warning. This high–pitched sound means you should schedule replacement within the next few hundred miles.
Grinding sounds signal a dangerous situation. The friction material has worn completely, allowing the steel backing plate to scrape against the rotor. This metal-on-metal contact damages rotors, increases stopping distances, and can lead to complete brake failure.
Vibration or pulsation through the brake pedal suggests either worn pads, warped rotors, or seized calipers. These symptoms indicate uneven pad wear or rotor surface irregularities. Professional inspection becomes necessary because multiple brake system components may require attention simultaneously.
Dashboard warning lights on newer vehicles monitor brake pad thickness through electronic sensors embedded in the pads. When illuminated, this light means pads have reached the manufacturer’s replacement threshold.
Brake Pad Measurement Best Practices and Safety Tips
Inspection frequency should match your driving conditions. Standard recommendation calls for checking brake pad thickness every 10,000-12,000 miles or during tire rotations. Severe duty applications like towing or mountain driving require inspection every 5,000-6,000 miles for adequate safety margins.
The 30-30-30 rule provides a simple maintenance framework. Inspect brakes at 30,000 miles, replace pads around 30,000-70,000 miles depending on wear, and examine rotors every 30,000 miles for thickness and surface condition. This systematic approach prevents unexpected brake failure.
Environmental factors dramatically affect pad lifespan. City drivers engaging brakes frequently in stop-and-go traffic wear pads faster than highway commuters maintaining steady speeds. Similarly, mountainous terrain demands constant brake application on descents, accelerating wear rates by 30-50% compared to flat regions.
Question’s
At what thickness should brake pads be replaced?
Replace brake pads when they measure 3-4mm of remaining friction material for optimal safety. Waiting until they reach the absolute minimum of 2-3mm eliminates your safety margin and risks expensive rotor damage.
What is the 30 30 30 rule for brakes?
The 30-30-30 rule means inspect brakes every 30,000 miles, replace pads between 30,000-70,000 miles, and check rotors every 30,000 miles. Severe driving conditions require more frequent inspection at 15,000-20,000 mile intervals.
Is 4 mm on brake pads ok?
Yes, 4mm is technically safe but indicates you should schedule replacement soon since you’ve used 65-70% of the pad’s life. Consider immediate replacement if you tow heavy loads or drive in demanding conditions.
How to measure brake pad size?
Use a digital caliper or brake pad gauge to measure from the steel backing plate to the friction material’s outer edge. Remove the wheel for accurate measurement and always check multiple points to detect uneven wear.
Conclusion
Brake pad measurement is a simple yet critical safety practice every driver should master. Regular inspection at 10,000-mile intervals, replacement at 3-4mm thickness, and attention to warning signs like squealing or grinding protect your vehicle and your life.
Don’t wait for complete brake failure. Understanding proper brake pad thickness standards and measurement techniques empowers you to make informed maintenance decisions, prevent expensive rotor damage, and ensure your vehicle stops reliably when you need it most.
See More: Counter Measurement: Precision Counting 2026

Hi, I’m Burhan Ali, the admin and author of PD Measurement. I write simple and clear blogs about PD measurement, measuring tools, and accurate sizing guides. My goal is to help readers understand measurements easily and make better decisions with confidence.